Feeling Blue? I’m Not, But My Hair is!

Blue Curly Colored Natural Hair JeweJeweBee Jewellianna.jpg
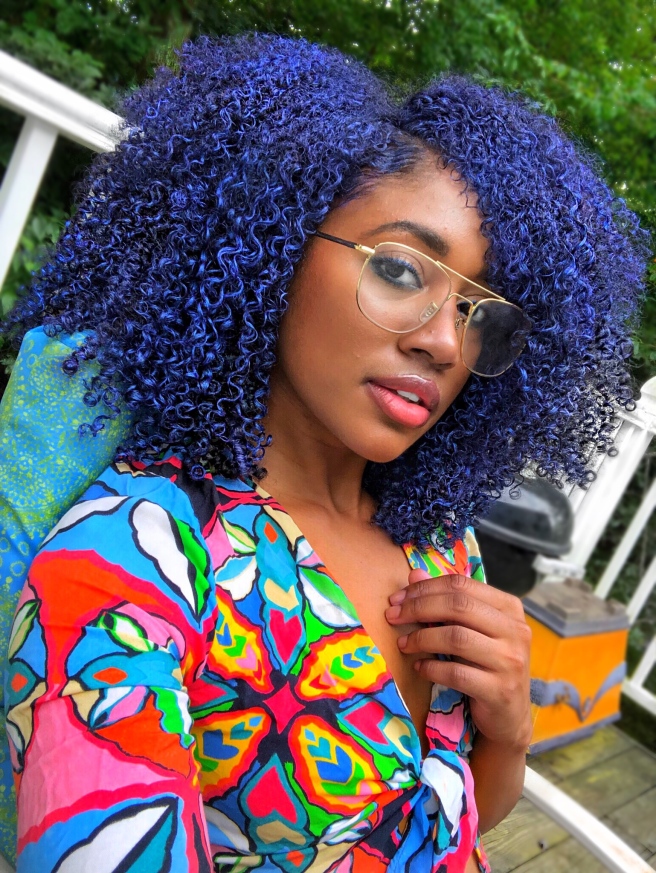
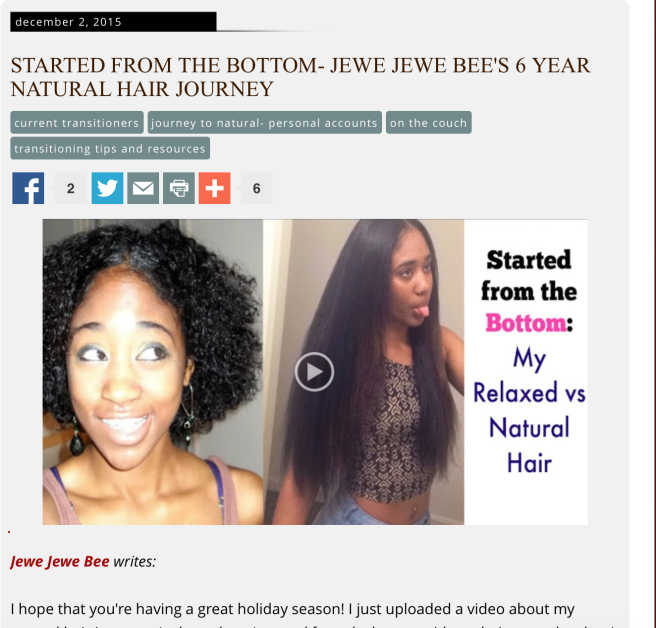
So I’ve got blue hair…. Well, at least for the next 2-3 days! After posting a photo of my new hair color on my Instagram, I had sooo many questions and people who were curious about how I did it! So let me give you guys the 4-1-1 on the process I took, how you can do it at home, and ALLL of the tea on this blue hairdo!

What I used!

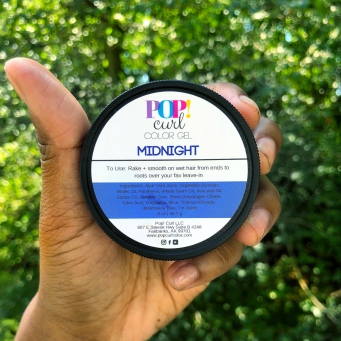
For my bright blue fro, I used my Pop! Curl Color Gel. The website describes their color gels as “a curl defining gel + temporary hair color makeup all-in-one”These “plant-based + non-toxic” gels come in colors that range from natural brown and red, all the way to bright green, purple, and blue! The website states that these gels are a non-sticky, minimally transfer temporary color that you can use as often as you’d like!

pop curl color gel midnight jewejewebee jewellianna blue curly natural hair

My Experience:


I used the Color Gel in the color “Midnight” described  as “a blue with purple undertones”  (which appears navy/dark blue on black hair). The gel itself came is a 2 oz plastic jar with a surprisingly small, and a luckily comprehensible, ingredients list! Some of the ingredients are Aloe Vera Juice, Avocado Oil, and Caster Oil,  which are known to be great for curly hair!

JeweJeweBee Blue Hair Natural Cury Hair Color PopCurlColor Midnight.png

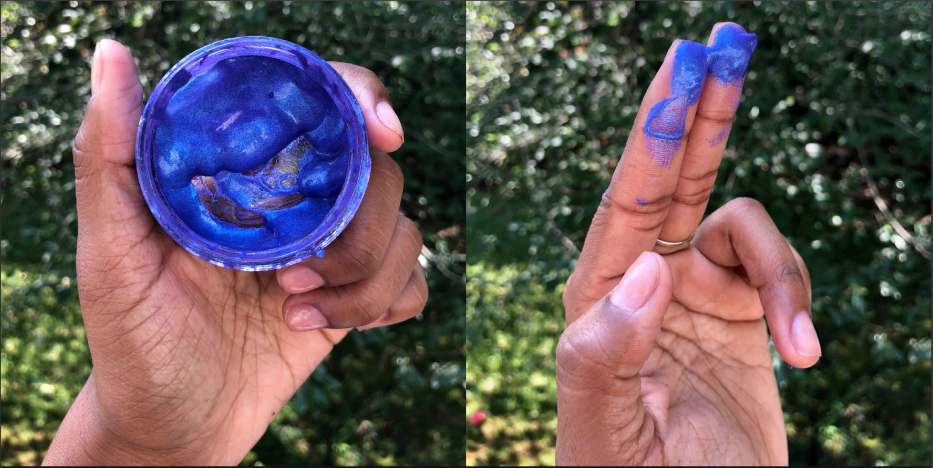
This Pop Curl Color gel was more a liquid consistency than I expected (which worked out great since I applied it on my dry hair, instead of applying it on wet hair which is recommended on the instructions). I expected it to be more of a thicker/ creamy consistency, but it was actually more similar to ranch dressing… yes, I’m hungry while writing this. haha

My Steps:

I first started off applying the gel on dry, day 5 hair. The directions said to apply it on wet or damp hair, however, I didn’t want to have to rewash my hair ALLL over again if I didn’t like it (Ya’ll already know how long wash days take.. so we weren’t wasting a whole wash day over here haha)!

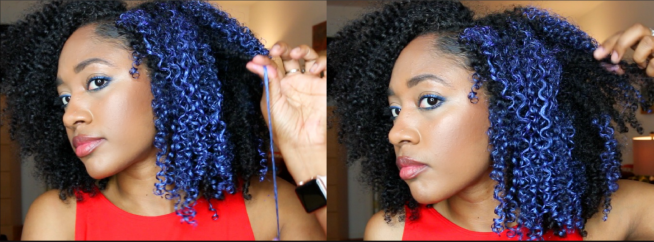
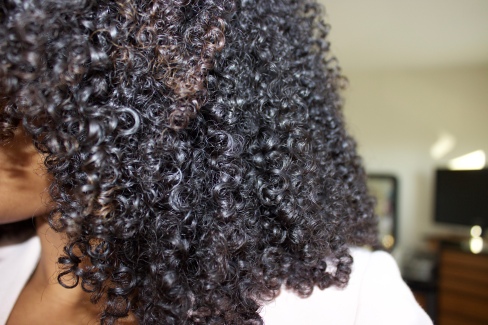
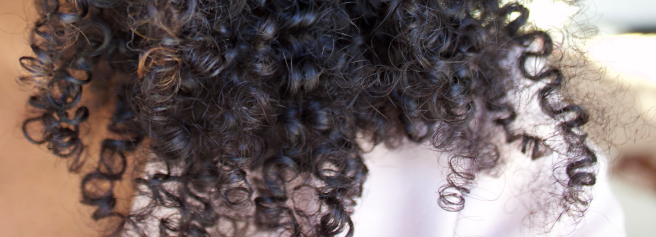
For application, instead of applying the color gel to my hair in sections, I worked it into my hair curl by curl. I felt like going curl-by-curl not only helped to get a more concentrated color all through out my hair, but it also helped to define my curls and make them really POP (since I was shingling the product into my hair while adding the color)!  Contrastingly, when I had applied the color gel to larger sections, the result was a less saturated and milder blue–that looked like more of a darker “hint” of navy blue, as opposed to the very bright blue results that I got going curl-by-curl.
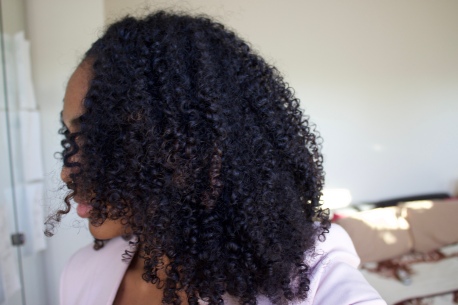
 

JeweJeweBee Blue Curly Natural Hair Temporary Color .JPG.png

The Results:

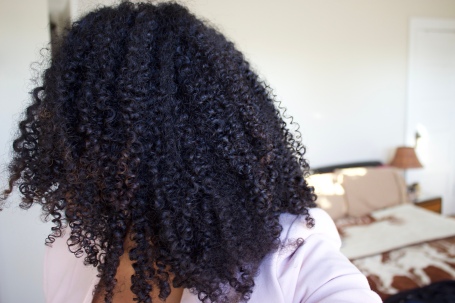
When I applied the gel, it did make my hair wet–since it contains Aloe Vera Juice and Water. But this didn’t last long, since I applied the product to dry hair AND also because it was also 90+ degrees outside (my hair went from wet to fully dry within one hour)! The wet results were gorgeous, but my dry results were super defined, blue curls that had NO crunch, NO stickiness, and most importantly, NO DAMAGE!

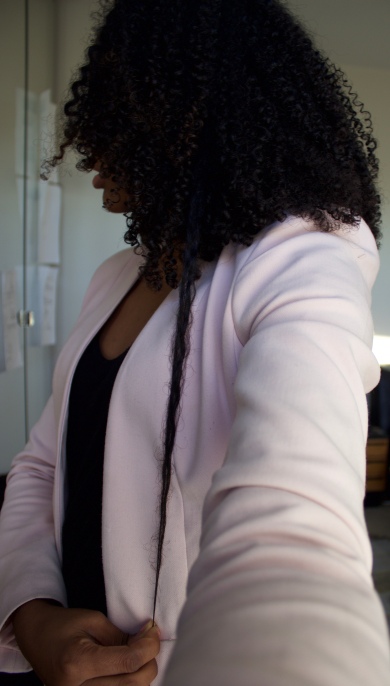
The color results in doors was more of a darker blue color, but outside, the color completely transformed. When I stood directly underneath the sun (Like I did it my picture on my Instagram), my hair transformed into a bright blue color that looked SUPER natural (well… as natural as blue hair can look haha) and vibrant!

Blue Curly Colored Natural Hair JeweJeweBee Jewellianna

FAQ:

  • How much gel did you use?
    • I had initially commented to one of my followers on Instagram saying that I used 1/3 of the jar. But I had forgot that was only the first side. So it took around 2/3 of the jar to do both sides (also, I did not do the back of my hair. It would probably take 1-2 jars to do my entire head AND to get a very bright blue like I did in my picture; it would probably take 1 jar if I wanted a milder navy-like-blue).
  • Does it make your hair feel hard/ crunchy/ flakey?
    • If you’ve ever used temporary hair sprays, they usually leave your hair feeling really hard and dry. But my hair felt soft and defined after using the Pop Curl Gel! The site actually sells a clear gel (with no color) because these gels can be used alone on hair JUST for definition!
    • Flakiness: The hair color does flake a little when dry, but only when you are currently rubbing or pulling at your hair (i.e. I didn’t have any blue flakes on my shoulders or clothes that had just fallen out just because).
  • Did you the color transfer or rub off onto clothes, pillows, etc.?
    • I had ZERO color transfer using these PopCurl gels. I even rubbed my hair onto onto a white shirt, white napkin… and still nothing. Once the hair gel is dry, I personally had no smudging onto my pillow, couch, or clothes!
  • How long does it last?
    • The website states that it lasts 2-3 days. My color was still vibrant when I woke up the next morning! If you need to remove the color, you can just wash your hair like normal if it still hasn’t faded away.
  • Does it stain your hands?
    • The gel was blue on my hands hands, but it can easily be wiped off with a napkin of rinsed off with water. So no permanent staining like regular hair dyes/ colors.
  • How do I make my color look so bright and concentrated like yours?
    • I applied the colors curl-by-curl, instead of in sections. This allowed me to fully saturate each curl with the midnight blue and also apply more color to each section. Also, the above photo was taken in outdoor light, where the color looks brighter (and indoors it looks darker and less saturated). Unfortunately, if you want more color, you would have to use more product which equals more $$$. However, you can extend the product by using less and applying in larger sections, which will give a beautiful and more natural color.


….So would you guys try out temporary hair colors? If so, what color would you try! ALSO, I plan on trying out different shades of these temporary color gels, so stay tuned on my Instagram to stay updated!


Her Given Hair Extensions| Unboxing and Review

wefted hair 5

I had the great opportunity to review Her Given Hair Extensions and it was such a new and exciting experience! I have never worn hair extensions before so I was unsure on what to expect or if I would like them, or even be able to use them. But I ended up really being happy with my results! I received 3 bundles of the “Curly”, 24 inch, clip-in extensions. However, I only ended up using two of them since each bundle was quite A LOT of hairwefted hair 3

Unboxing

Once the hair arrived, I cowashed it with a deep conditioner and then sealed it with Argan Oil. Afterwards, I got to see the more authentic quality and texture of the hair. My hair extensions after being co-washed, finger detangled, sealed with oil and air dried were very tightly curled; they had a tight S-Curl at the top and coiled at the end. It wasn’t an exact match to my hair texture; however, I realized that this was due to an error on my part. Because I had only finger detangled the hair, it had kept the “straight out of the box” look and feel. It wasn’t until my second time cowashing the extensions (when I detangled them with a Denman brush and not just finger detangled them) that I was able to achieve a more natural curl pattern that matched my hair perfectly!

The picture on the left is the hair finger detangled; and the picture on the right is the hair after it has been combed with a Denman. As you can see, the hair blends pretty much PERFECTLY with my natural hair after it has been combed with the Denman.

After cowashing the extensions, I noticed a few other things about the Her Given Hair extensions:

  • The color was a pretty close match with my hair. It was slightly darker than my natural hair but it was not an obvious difference; only I could notice it.
  • The luster of the hair was more shiny right out of the box, but after being cowashed and separated a bit, the curls lost some luster and had the same luster as my natural curls.
  • The tangle level of the hair was a lot less than my natural hair and the extensions were fairly easy to detangle.
  • The shedding level of the extensions was similar to my natural hair which I expected from them straight out of the box and being detangled for the first time.
  • The length of the extensions were a lot longer than my naturally curly hair since they were 24 inches. My curls shrink to my shoulders and the extensions gave me curls to my bra strap, which was pretty awesome!wefted hair 6

You can watch my Unboxing Video HERE on YouTube where I show an unboxing and review of the hair, the sample kits which include the 3 different hair textures that Her Given Hair’s site offers, and how I cowash and install the hair!

Dyeing/ Styling my Her Given Hair Extensions

To style my hair, I decided to dye the extensions ombre using a blonde box dye. After dyeing the extensions, I deep conditioned them, detangled them with a denman brush and installed them in my hair. As you see, the extensions blend in with my natural hair very well!wefted hair 6

If you would like to watch this video, then you can  view it HERE on my YouTube channel!

All in all, I am very happy with my experiences with my Her Given Hair Extensions; my first experience with hair extensions was definitely a very, very pleasant one! If you are interested in purchasing Her Given Hair Extensions,then you can check out their website here!

Hair description of the extensions that I recieved: http://www.hergivenhair.com/?y=Jewell

Instagram- @hergivenhair
YouTube Official Channel: https://goo.gl/FfU4H8


I’ve been featured on CurlyNikki!

Screen Shot 2015-12-05 at 12.06.05 PM.png

Hey beautiful people! I have awesome news that I just found out. I was featured on CurlyNikki on December 2nd for my video “Relaxed vs Natural Hair: Chemical and Heat Damage”! If you like the see the article on CurlyNikki.com then you can click here! I’m so thankful for Nikki for supporting my channel by using her huge platform to feature YouTuber and bloggers like myself! Nikki, I love you!

My Relaxed Vs Natural Hair: Chemical and Heat Damage

Hey guys! I just uploaded a new video up on my YouTube channel! It’s my relaxed hair journey and it compares my relaxed hair (which I thought was my healthy and normal hair at the time) to my current hair. I show how damaged my hair was from relaxers, excessive bleaching and dyeing, and constant heat. It wasn’t until I learned that what I was doing was a problem, and started taking care of my hair, that my hair was able to grow and thrive. I hope that you all enjoy!


My Updated Curly Hair Routine!

Here’s my new updated FULL curly hair routine! All of the products (besides the EcoStyler gel, which I only use on my edges) are paraben, silicone, and sulfate free! Lately I’ve been trying to use more natural products on my hair and seeing how they work. This past summer, I spent over a $100  on natural and healthier hair products and these are the only ones that I liked. The other ones left me with hair that I HAD to wash the next day because they weren’t moisturizing enough. I hope you guys enjoy the video. Below are what I used in the video! You can also check out how I stretch my hair here https://www.youtube.com/watch?v=aoTjjTKiBVE

Products used in this video:

Single Strand Knots: Should you worry? Plus how to prevent them!

Screen Shot 2015-11-22 at 1.06.52 PMOne day in my biology class, I decided to look at my hair under a microscope (when I was probably supposed to be looking at the amyloplast of a potato… or the chloroplast in Elodea lol). I looked at the root of my hair, the split ends… and then a single strand knot. And what I found was that my hair was literally was in a knot; a hair that had wrapped around itself like a headphone cord after it’s been in your pocket for two seconds!

Single strand knots are not the result of damage… they are a fact of life for tightly curly hair. It is literally just a tight knot that forms in the hair. However, single strand knots can be a problem. When it comes to the detangling process, hairs can get caught onto single strand knots which can cause the hair to snag creating more tangles. These knots can also be rough to the touch. How do you get rid of them? Simply by cutting them off… there is really no other way. And try to not pull them off as this can actually lead to damage and rough ends.

So now, how to prevent these pesky little knots? Here are my FOUR tips on how to prevent single strand knots!

  1. Protect Styles:

When your hair is neat and tucked away, your hair doesn’t even have a chance to tangle up. Imagine the difference in knots if you threw your headphones into your purse versus neatly wrapping them around a heaphone cord organizer (yes, these actually exist and sound like the best invention ever)! You would expect to have a lot more knots in the cord that was just thrown into your purse. If you have your hair neatly tucked away (e.g. in a braid, bun, or twist), the strand does not have a chance to wrap around itself and to create a knot.

  1. Keep your hair moisturized!

Dry hair=frizzy hair. As much as we all love big and crazy hair, this craziness can lead to crazy amounts of single strand knots. When your hair is moisturized, sections of your hair clump together to create a unit of curls. When our hair is dried out, the hair strands become antisocial and separate from the unit of curls to stand alone… our curly hair is such the independent diva! (Look at your moisturized curls versus your frizzy curls… your frizzy curls are usually separated into single strands that create a poof ball effect). When your single strands are alone (dry and frizzy), they have more of a chance of wrapping around themselves than moisturized and clumped together curls.


  1. Replace your Wash and Go’s for Braid-Outs or Twist-Outs

This may be more of an issue for people with longer hair that shrinks a lot…pretty much my hair. When I do braid-outs or twist-outs, my hair has dried into an organized clump that has set into the shape of the twists or the braids. When I do Wash & Go’s, my hair dries into whatever shape and sets however it wants. My Wash & Go’s lead to much less defined hair and my strands (from different sections) usually dry in an unorganized way (my strands cross over and become wayyy too social with other clumps of hair that they aren’t supposed to specialize with). This can make the detangling process HELL!! And when I try to detangle, that strand is now more likely to wrap around itself because my hair has dried in a tangled and unorganized way. As much as I love the appearance of my wash and go’s, it makes it a lot less easier to manage and leads to a lot more single strand knots.

  1. Playing in your hair

Hello my name is Jewellianna and I am addicted to playing in my hair. If you have hand-in-the-hair-disease please confess so that I don’t feel alone. Lol This is probably one of the BIGGEST causes of my single strand knots. I play in my hair constantly; pulling strands of hair apart from its neat unit of curls can lead to the hair wrapping around itself. Hair that is wrapped around itself has only one fate–to form a single strand knot. After I am done, I am left with at least 10 additional single strand knots of hair…. Pull. Your. Hand. Away. From. The. Strand!

Don’t stress over single strand knots if you have them; they truly come with the territory of having wild, curly hair. If you notice that you have a ton of single strand knots or that they are just becoming annoying, it may be time to change your hair routine and incorporate some of these tips.

Part 3: 5 Do’s for Long, Healthy Hair

So you have avoided all things that damage the hair mentioned in Part 2: 5 Things to Avoid for Long, Healthy Hair. You’ve stayed away from heat, chemicals, playing in your hair, product buildup, and you’re extremely gentle when detangling your hair. However, you still face hair problems; your hair is frizzy, dry, crunchy, flat, or all of the above. Or maybe you’re just not achieving the your hair goals or just want to know how you can step up your hair care routine. Today I will discuss 5 things that you can do to your hair routine to get closer towards long and healthy hair.

  1. Use Moisturizing  Products

When you’ve avoided everything mentioned in Part 2 and still face hair problems, the next thing to look at is the products that you are using! The most perfect head of curly hair (if there is such a thing), will even look lackluster if crappy products are applied to it. Us curly girls have hair that tends to be on the drier side, and unlike people with straighter or wavier hair who do not need to be as selective with products, we need to be careful in choosing products for our dryness-prone hair. I’ve bought products that left my hair feeling dry, sticky, flat, and frizzy. I’ve also bought products that left my hair feeling moisturized, shining, and super defined. Believe me, with the right products, your hair can transform. Check out my article Product Recommendations fro Curly Girls to see which products I love and recommend!

  1. Cleanse the length of your hair if you use silicones, butters, or oils on your hair

So in Part 2, we discussed how product buildup can prevent your hair from being moisturized. Butters and oils, when applied to dry hair, just sit on top of the hair and do not offer moisturizing benefits because they do not contain water. Silicones are another substance in MOST conditioning product, usually unless noted otherwise, that lead to product buildup. Silicones can be great in a hair care routine because they add slip (yaye for detangling) and add softness to the hair.

However, these products can feel great initially but after continued use, they can coat the hair and prevent the hair from absorbing water. This leads to chronically dehydrated hair that looks soft, due to artificial chemicals and the artificial shine from oils and butters. Click Here to see a list of  water-soluble (silicones that can dissolve in water) and water- insoluble (silicones that must be washed off with shampoo).

I could go on and on about silicones and product buildup, and I think that I’ll write a separate article about it. For now, just know that you must cleanse the length of your hair to remove oils, butters, and silicones whenever you wash your hair (unless you wash your hair everyday, then you can just stick to “removing” twice a week and cowashing the other 5 days). Cowashing can be very beneficial to the hair. But unless you completely avoid products with oils, butters, and silicones, you must remove these heavy products from the length of your hair when you wash your hair. (The two exception to using oils or butters is right after washing when they can seal the water into the hair. The second exception is using coconut oil as a prepoo because the proteins are able to absorb into the hair. All thought the coconut oil doesn’t offer moisture (water) to the hair, it does provide benefits to the hair by adding protein. Besides these two situations, oils just sit on top of the hair and add shine or softness to the hair). Keep an eye out for my article on how I remove product buildup from my hair.

  1. Wash/ Cowash to suite your hair’s needs

During a period of my natural hair journey, it was normal for me to go two weeks between washes. While I was in college, I went one month without washing my hair, and I did not wear protective styling (covers eyes in shame). Not only did this create MASSIVE amounts of tangles (it was taking me 4 hours to detangle), it left my hair dry and brittle. Going too long in between washes can lead to dehydrated hair, and dehydrated hair is hair that is prone to breakage. Ideally, my hair does best when I wash it every other day or twice a week. Unfortunately, it takes very long for my hair to dry so I settle for washing my hair twice a week. I recommend to wash hair at least once every week; you can go every two weeks if you consistently wear your hair in protective styling but I think that once a week is best; just try out different frequencies. I used to wash my hair only once a week because someone else recommended that routine, but now I realize that my hair thrives on being washed twice a week. Don’t be afraid to go outside of your routine; a change may be the very thing that your hair needs.

  1. Wear protective styling—but do not keep them in for too long

Protective styling is truly a beautiful thing when it comes to growing long hair. Buns, braids, twists, ponytails, weaves (that do not need a leave out that requires straighteneing), and wigs keeps your hair from getting tangles and single strand knots, thus, reducing the risk of breakage from the detangling process. My hair thrives when I wear it in buns or braids, and keep it away and protected. However, “protective styling” can also be damaging to the hair when used improperly. I will discuss different styles that are not protecting your hair, but often thought of as protective styling:

  • Wearing wigs, weaves, braids, and twists for long periods of time-

These styles can give us a break from dealing with our hair while offering our hair protection. However, when they are left in for too long ( for months on end) and when the hair underneath is neglected, these styles can be damaging. Hair needs moisture and our scalp needs to be kept clean. If our hair does not receive water, it becomes dry, brittle, and prone to breakage. If our scalp is not clean, our hair follicle becomes clogged, preventing growth. Make sure that you aren’t leaving your styles in for months at a time and neglecting your hair underneath

  • Flat ironing your hair during the winter-

I often hear people say that they want to give their hair a break, let their hair rest from being curly, or take a break from washes. This is not protective styling; it is jus styling. Flat ironing or Dominican blows out are damaging and are counterproductive to protecting your hair to achieve growth.

  • Wearing tight braids, buns, weaves, wigs or twists-

All thought these styles can be extremely beneficial to hair growth, if installed in too tight, it can actually lead to hair loss. “Traction alopecia is a form of alopecia, or gradual hair loss, caused primarily by pulling force being applied to the hair. This commonly results from the sufferer frequently wearing their hair in a particularly tight ponytail, pigtails, or braids.” This can happen on any part of our hair, but is most likely to occur at the fragile and fine edges of the hair, resulting is patches of hair loss in our temple and crown area.

  1. Trim your hair

When our hair leaves the scalp, it is no longer living; it is dead. This means that hair CANNOT repair itself and any damage is permanent. There are products that artificially “heal” the hair by fillings holes in the cuticle, but this is only temporary. Hair that has been damaged, whether it be from heat, chemicals, or even unavoidable wear and tear, needs to be cut off. Split ends can travel up the hair shaft. Damaged cuticles can snag onto other hairs and create tangles. Hair that is damaged needs to be cut if you want healthy and thriving hair. Deciding when to trim your hair is based off of your hair’s needs.

  • If your hair has significant visible damage and breakage that you are trying to get rid of, you may need to cut it as frequently as it is growing (if hair grows the average of 6 inches per year or 0.5 inches per month, you can trim 1 inch every two months. At the end of the year, your hair will be the same length, however, you will have cut off 6 inches of damage.
  • If you use chemicals and heat, without visible damage then your hair may need to be cut less often (a very small trim every 3-4 months) to prevent split ends from traveling up the hair shaft. **I trim my own hair every 4 months even though I don’t have visible damage. This is to get rid of and prevent split ends.**
  • If your hair is relatively healthy, has no visible damage or straight pieces, and has few split ends, you could get away with trimming your hair once or twice a year. However, if you do notice an increase in split ends, your ends feel rough to the touch, or you notice that your hair is getting tangled more easily, you may want to increase it to every 4 months.

I hope you all found this article helpful! Please keep checking back for new articles and YouTube uploads!